
In the world of digital marketing, tracking and analysing the performance of our campaigns is crucial to optimising our efforts and achieving our business goals. One powerful tool that helps in this endeavour is UTM tracking. UTM parameters are widely used in Google Analytics 4 (GA4) to gain insights into campaign performance and understand the impact of different marketing channels. So in this article let’s explore what UTM tracking is, why it is important, how to create UTM codes, where to see UTM data in GA4 and last but not least define the best practices for UTM tagging.
What is UTM Tracking and why is it important?
UTM tracking is a method of appending UTM parameters to the URLs of your marketing campaigns to track and attribute their performance accurately. UTM stands for Urchin Tracking Module (I still hear some digital marketers industry refer to it as the Urchin Traffic Monitor) which was the predecessor to Google Analytics. UTM tracking allows you to measure the effectiveness of different marketing activities and understand which channels or campaigns are driving the most traffic, conversions, and revenue.
A UTM code looks something like this:
http://yourwebsite.com/your-article/?utm_source=googleThe portion following the ‘?’ symbol is referred to as the UTM code. As you may have already deduced, this specific code tracks who sent the traffic to the page (i.e. the source).
The importance of UTM tracking lies in its ability to provide valuable insights into our marketing efforts. By properly tagging your URLs with UTM parameters, we can attribute website visits, conversions, and other key metrics to specific campaigns, channels, or even individual marketing assets. This data can help us understand the ROI of our marketing campaigns, identify high-performing channels, help us optimise our marketing budget (your boss will be happy), and make data-driven decisions in order to drive better results.
What are UTM Parameters?
UTM parameters are specific pieces of information added to the end of a URL that allow Google Analytics (GA4) to identify and track the source, medium, campaign, and other relevant information about the traffic coming to our website.
The five standard UTM parameters are:
- Source (utm_source): Identifies the specific source of the traffic, such as a search engine (Google, Bing), social media platform (Facebook, Twitter), or newsletter. Example: utm_source=Twitter.
- Medium (utm_medium): Indicates the medium or marketing channel through which the traffic is coming, like organic search, email, or display ads. Example: utm_medium=email.
- Campaign (utm_campaign): Represents the name or identifier of the campaign you are running, such as a product launch, seasonal promotion, or event. Example: utm_medium=socialmedia.
- Term (utm_term): This parameter is primarily used for tracking keywords in paid search campaigns (PPC), although it can be customised for other purposes. Example: utm_term=performance+advertising+software.
- Content (utm_content): This parameter is optional and can be used to differentiate between different versions of the same ad or link. In other words use this tag to explain which specific element was clicked, like a footer call to action button or header banner. Example: utm_content=headerlink.
Note: Unlike Universal Analytics, GA4 requires sending at least one parameter to identify your campaign.
How to create UTM codes for Google Analytics 4?
Creating UTM codes is a fairly straightforward process. You can generate UTM codes using Google’s Campaign URL Builder or various other online tools available. Of course, you can always type them manually but the problem with the manual approach is that UTM codes can become very lengthy and there’s a chance you’ll make a mistake.
Here’s a step-by-step guide to creating UTM codes
- Step 1: Carefully identify the parameters you want to track (critical). Before creating UTM codes, determine the specific information you want to capture, such as the source, medium, and campaign name.
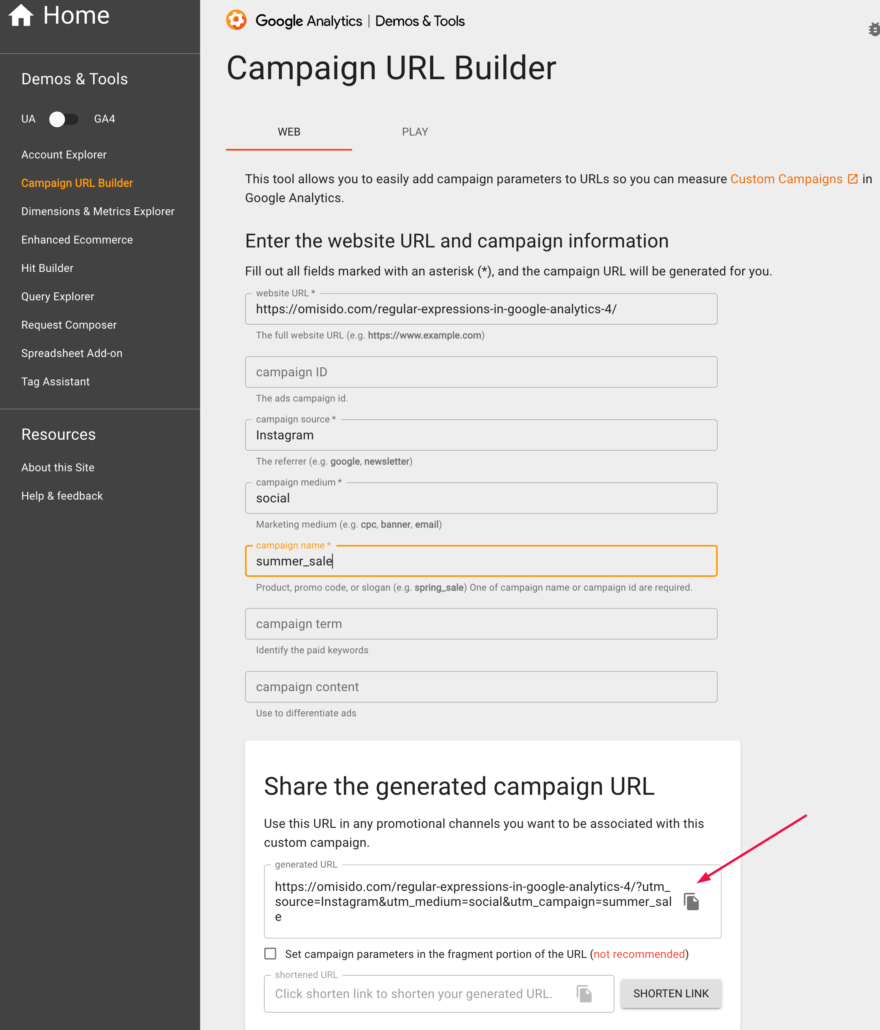
- Step 2: Use Google’s Campaign URL Builder – a user-friendly tool that allows you to input the necessary information and generates a tagged URL for you. It is as easy as entering the desired website URL, source, medium, campaign, and optional parameters like term and content and the tool will generate a UTM-tagged URL that you can use in your marketing campaigns.
- Step 3: Customise and shorten the URL (optional). You can further customise the generated by using a shortening service like bit.ly to make the UTM-tagged URL more user-friendly and visually appealing.
- Step 4: Implement the UTM-tagged URLs. Once you have your UTM-tagged URLs ready, use them in your marketing materials, such as email campaigns, social media posts, banner ads, or any other promotional channels you utilise.
How to track UTM parameters in Google Analytics 4
In GA4, UTM data can be viewed and analysed in various ways, but the Traffic Acquisition report is likely the initial destination to explore.
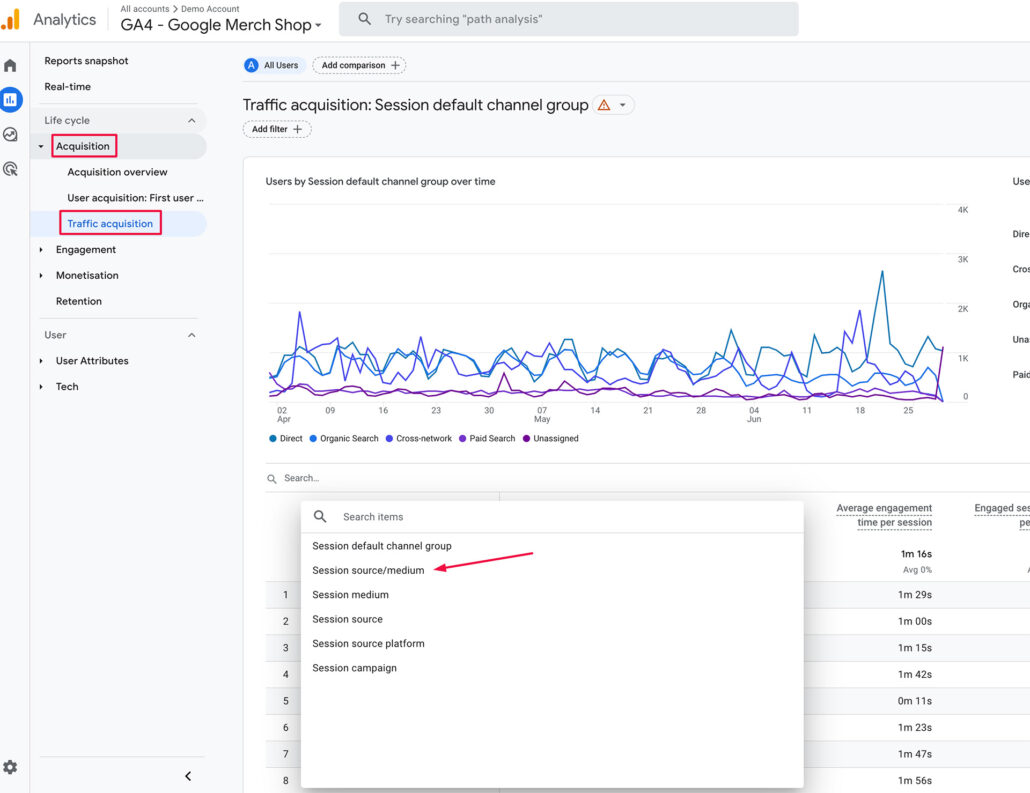
To access it, go to Reports → Acquisition → Traffic Acquisition and modify the table’s initial dimension (Session default channel group) to Session source/medium.
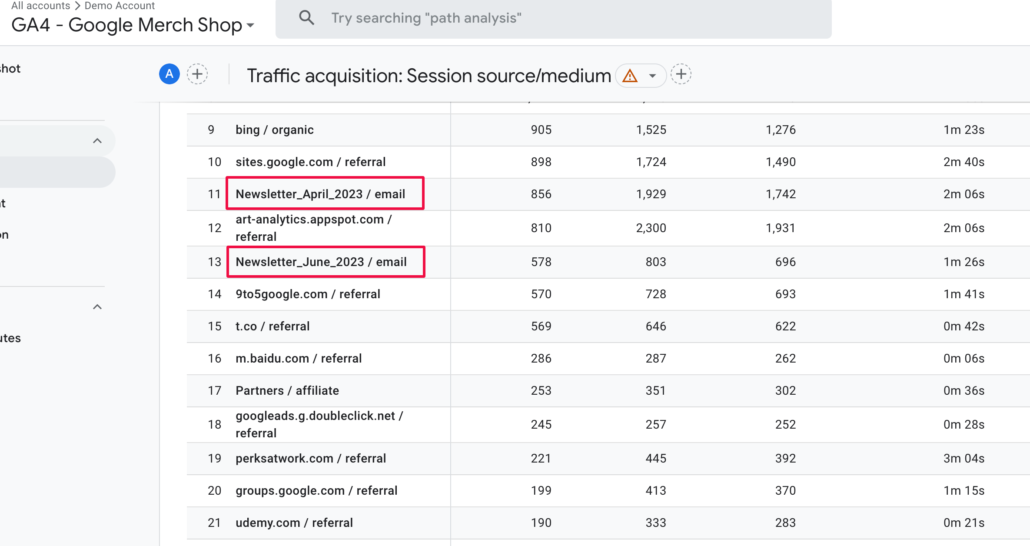
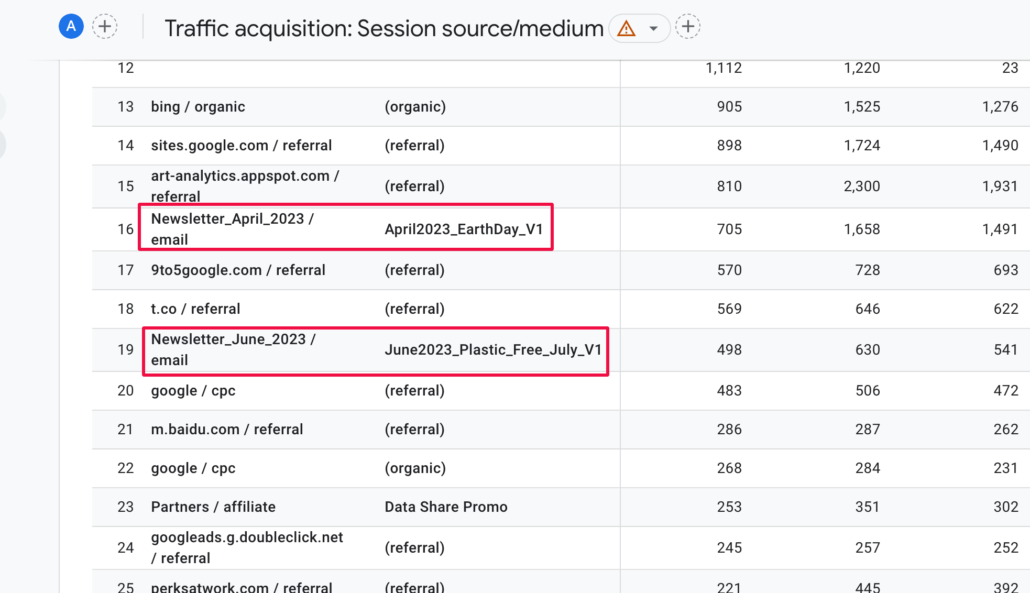
Excellent! Now we can observe our newsletter source along with the email medium. As usual, I am utilising the Google Demo account, which is a fully operational Google Analytics 4 account accessible to anyone already using Google Analytics.
If you wish to view other UTM parameters in Google Analytics 4, you can add a secondary dimension to the table by clicking the “+” sign.
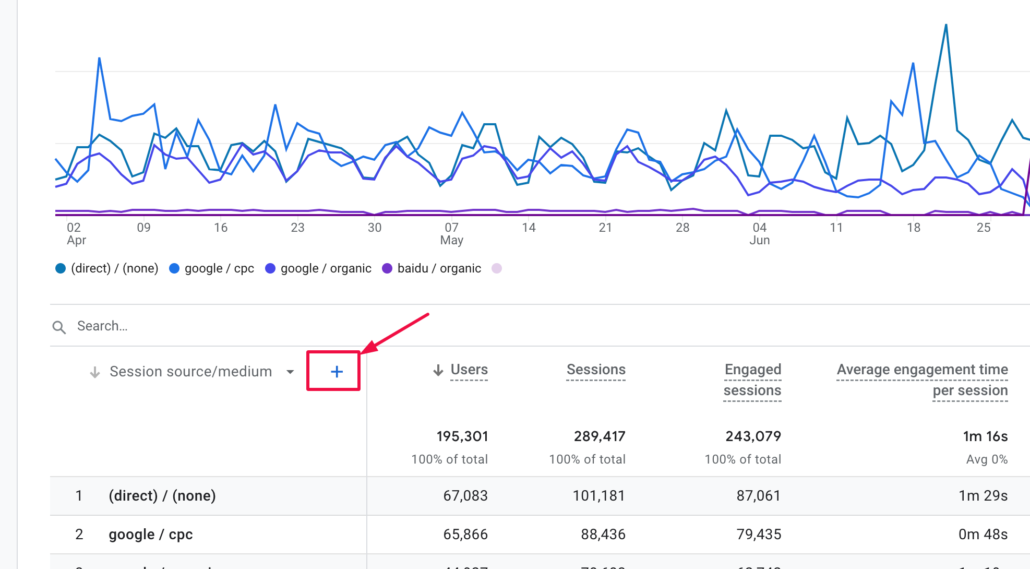
For example let’s search for campaign, then select Session campaign.
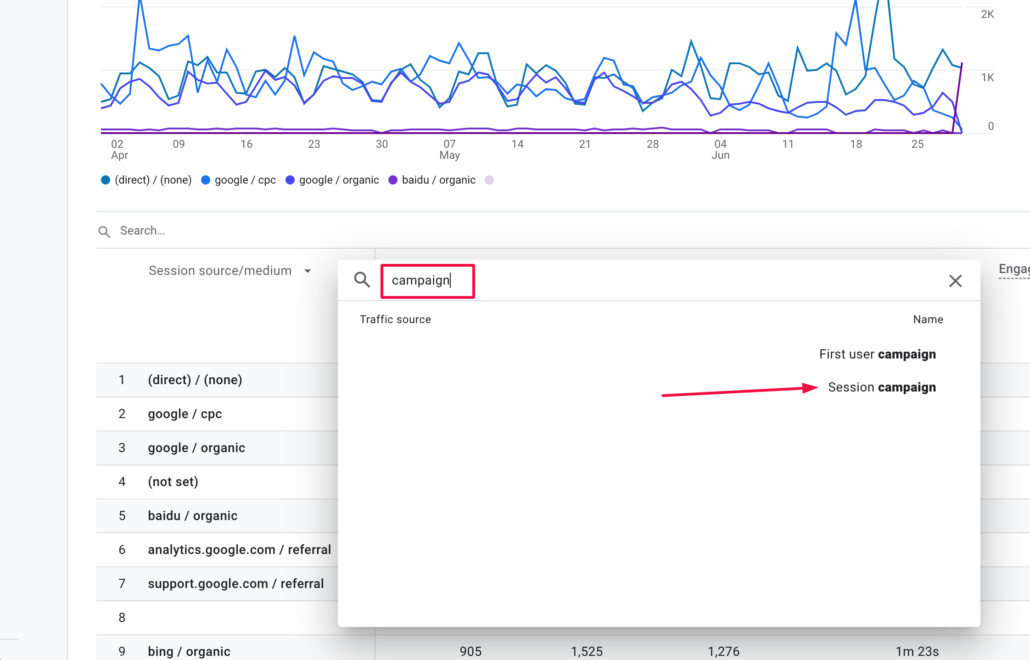
For some reason, it takes a few seconds for the table to update and display the campaign name we entered in the Campaign URL Builder.
Please note that the traffic acquisition report table has a limitation of presenting a maximum of two dimensions.
If you desire a more in-depth analysis of the data, I would suggest directly exploring the exploration reports, which are always my preferred choice for analysing UTM data in GA4.
Analysing UTM Parameters in Exploration Reports
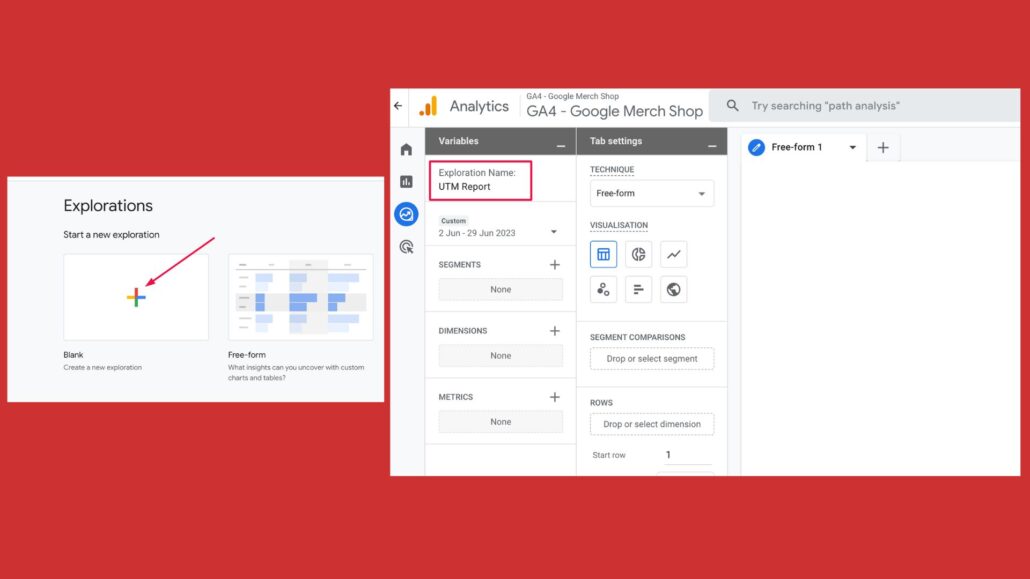
The Explore section of Google Analytics 4 is by far my favourite tool. So go to Explore, click on a blank report and provide a distinctive name for this exploration report. I guess ‘UTM Report’ is appropriate.
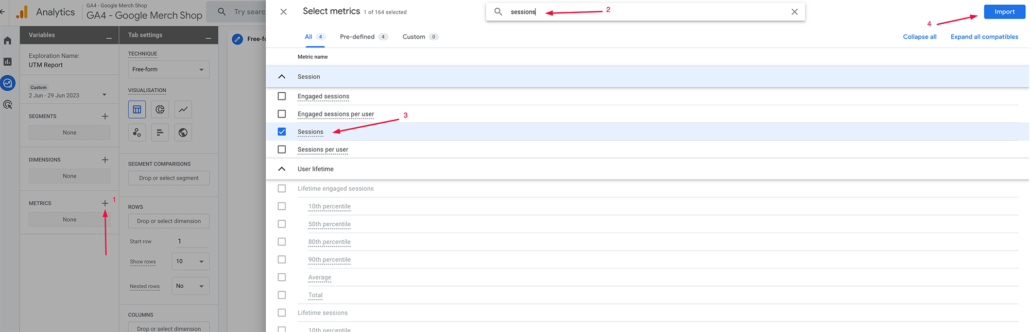
The next thing we need to do is specify the data we want to put together. Click on the ‘+’ sign in Metrics then type ‘sessions’ in the search bar, then select Sessions and finally, click Import.
Now for the dimensions, we have to add all our UTM parameters but as naming in Google Analytics 4 is not very intuitive we must know the corresponding values hence I am giving you this table below.
| UTM Parameter | GA4 Dimension |
| utm_id | Session campaign ID |
| utm_source | Session source |
| utm_medium | Session medium |
| utm_campaign | Session campaign |
| utm_source_platform | Session source platform |
| utm_term | Session manual term |
| utm_content | Session manual ad content |
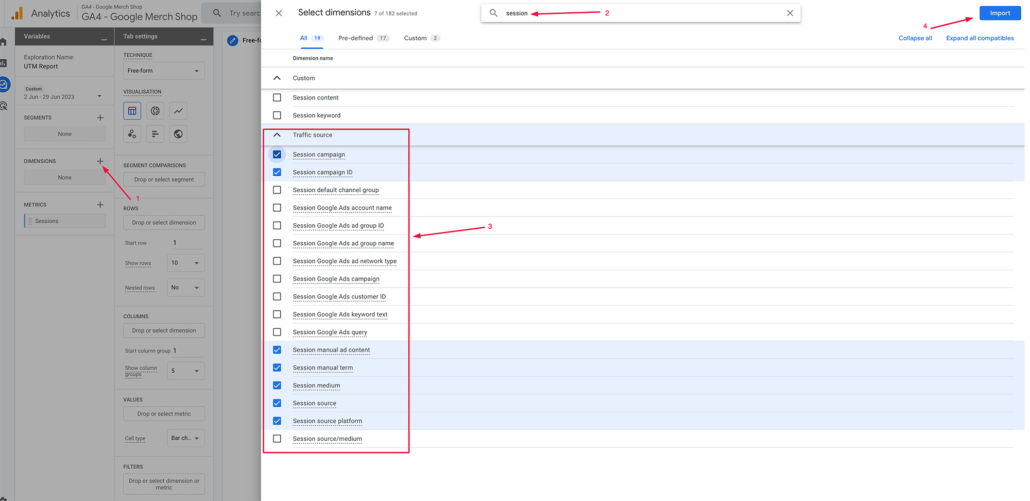
To make things easy I can tell you that all UTM parameters in Google Analytics 4 are under the Traffic Source section so to add dimension click on the “+” sign, search for ‘session’, select all the matching dimensions and finally click Import.
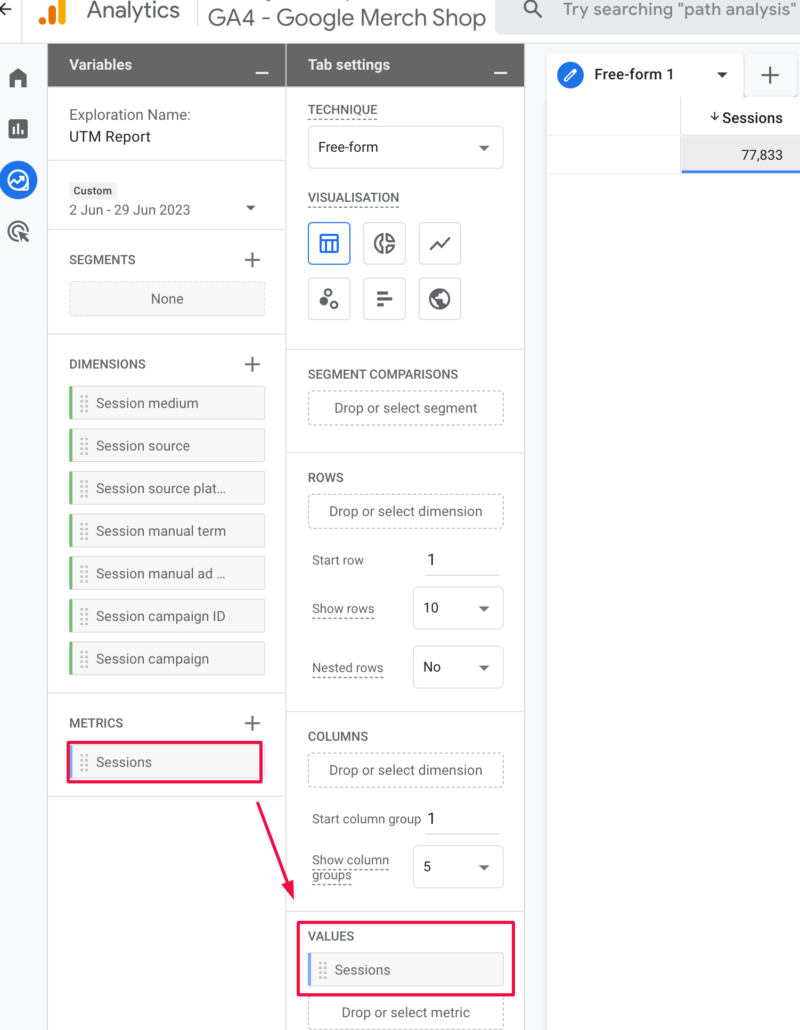
To start building your report click and drag Sessions to the Values section in order to see data coming in.
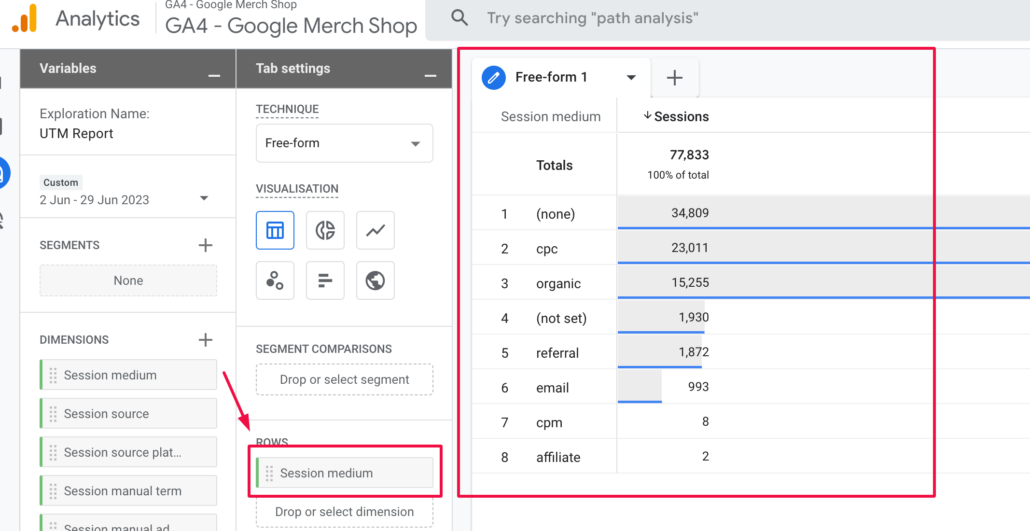
Next, add the Session medium dimension to the Rows section so you can see the data for the mediums you used in a table to the right.
Next, add the Session source, as well so you can see your newsletter source (in my case this is Newsletter_April_2023, Newsletter_June_2023 etc.).
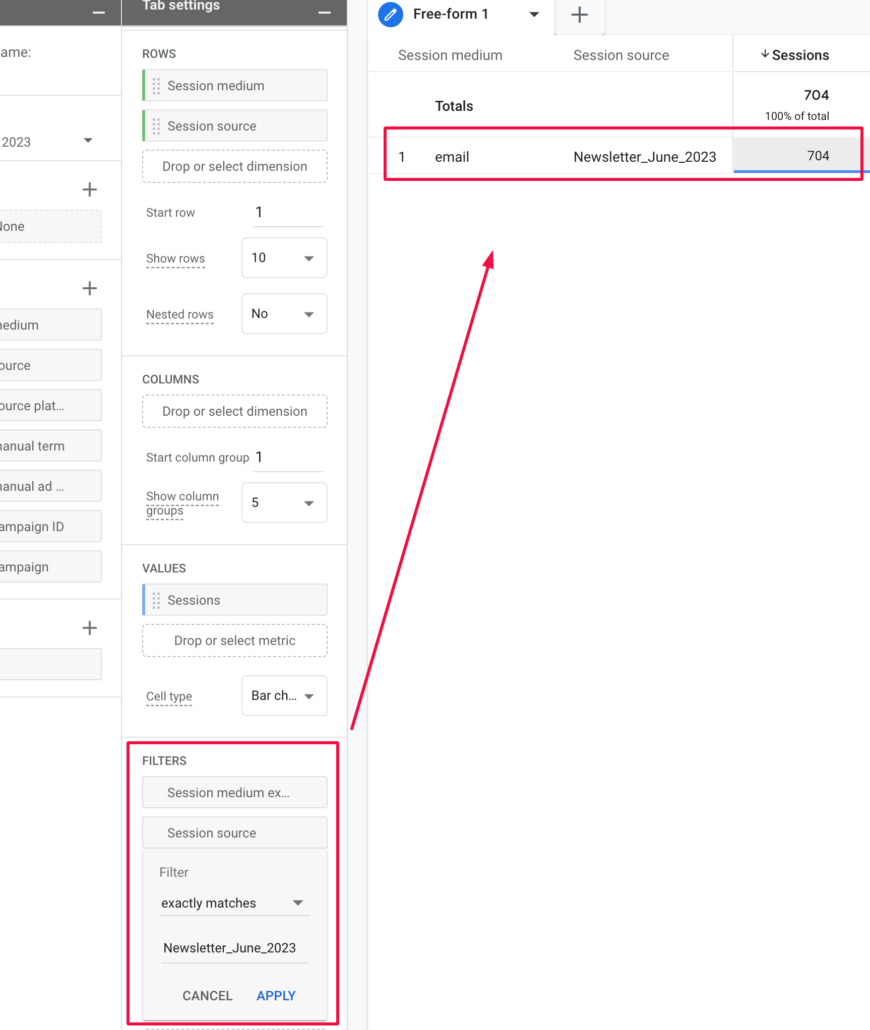
As we only want to focus on data for our newsletter we should add a filter to our report either by using the Filter section (below Values) or by simply clicking on the dimension/metric we want to filter in the table and selecting ‘Include Only Selection’. This will automatically apply a filter for the Session medium that matches the email.
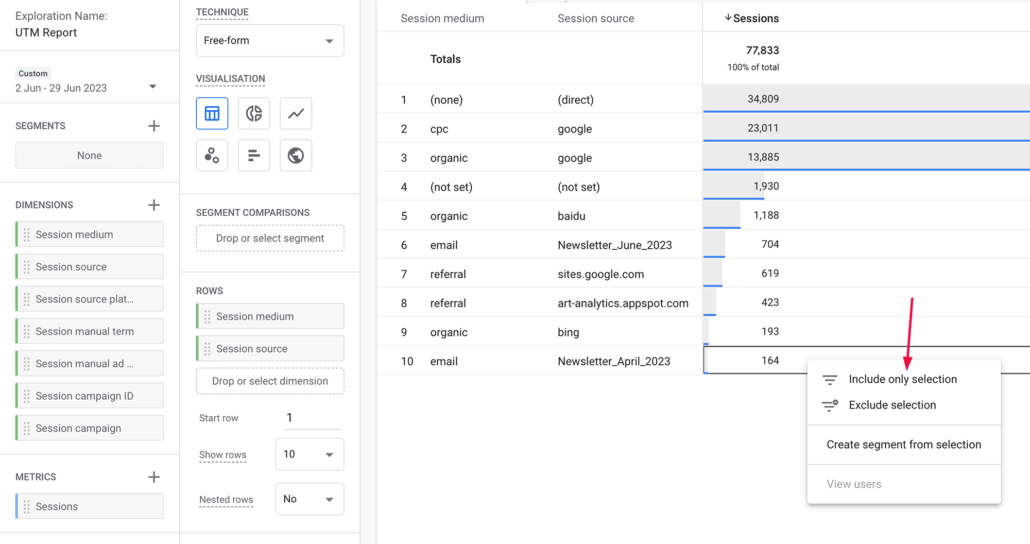
It will automatically appliy a filter for the Session medium that matches the email.
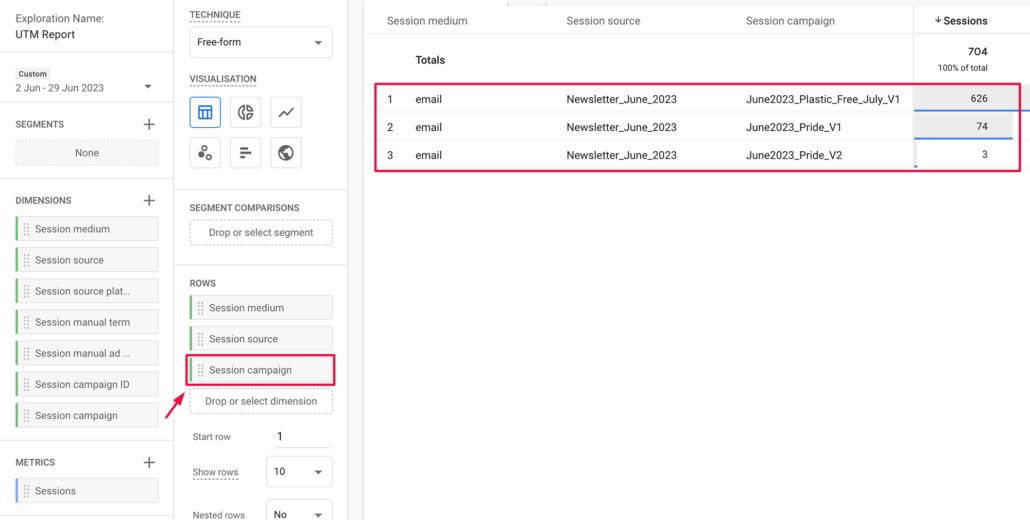
Adding another dimension like a Session campaign will allow us to compare the two versions of the newsletter and it looks like the June2023_Plastic_Free_July_V1 newsletter was a lot more successful than June2023_Pride_V1 or June2023_Pride_V2.
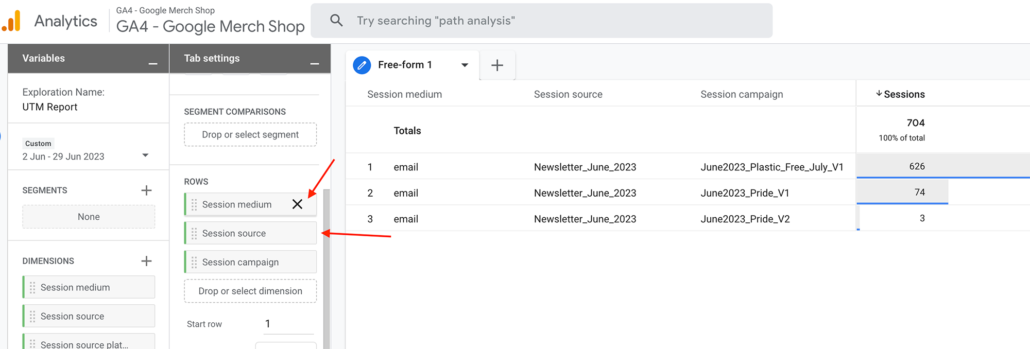
If you think that our report is a bit overcrowded since we have already filtered the report, remove the Session medium and source by clicking ✖.
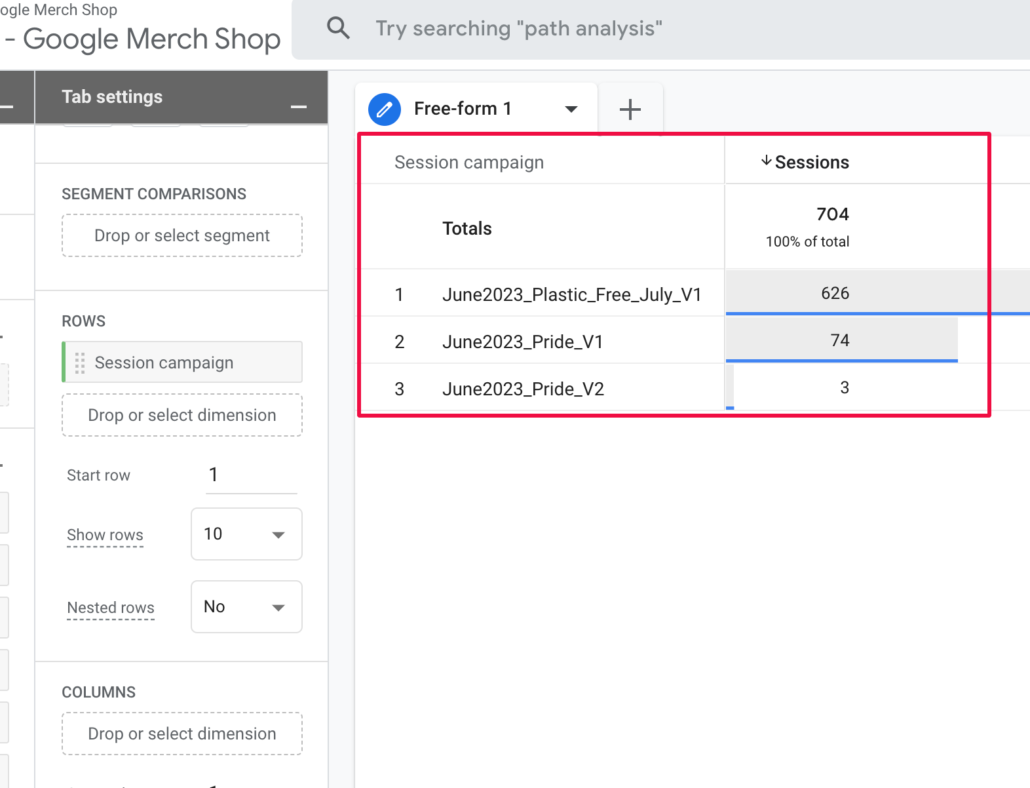
We can now focus exclusively on the session campaign, specifically filtered to include only the email medium and newsletter source.
Since this is an eCommerce store let’s add more metrics at this stage of building the Explorations report in order to confirm whether one of the newsletters was definitely better than the other – I guess adding the Transactions metric makes a lot of sense.
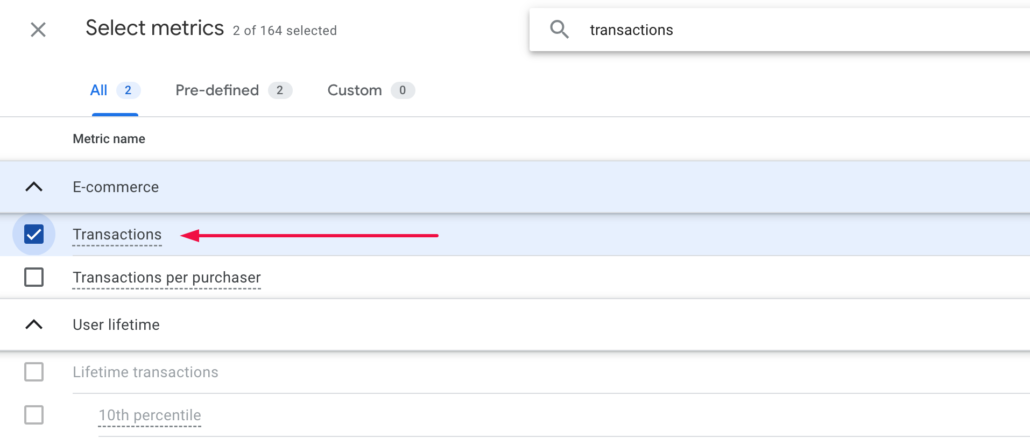
It looks like we got more transactions on the first newsletter version so the June2023_Plastic_Free_July_V1 newsletter is definitely a winner.
Best practices for UTM-Tagging
To make the most of UTM tagging, consider the following best practices:
- Consistent naming conventions. Establish a clear and consistent naming convention for your UTM parameters to ensure accurate tracking and easy analysis. This includes using standardised formats for source, medium, and campaign names.
- Avoid over-tagging. Be mindful not to over-tag your URLs with excessive UTM parameters. Stick to the parameters that are relevant to your tracking objectives to prevent clutter and confusion in your analytics data.
- Test and validate UTM codes. I can’t stress enough how important is before launching your campaigns to test the UTM-tagged URLs to ensure they are working correctly and capturing the desired data. Validate the data in GA4 to verify that it aligns with your expectations.
- Use UTM parameters in offline campaigns. It may come as a surprise but UTM tracking is not only limited to online campaigns. You can also utilise UTM parameters in offline marketing channels, such as print ads or direct mail, to track and measure their impact on website traffic and conversions.
- Regularly review and refine: Continuously monitor and analyse your UTM data to identify trends, optimise your marketing efforts, and refine your campaigns. Regularly review the performance of different sources, mediums, and campaigns to allocate resources effectively and drive better results.

Summary
I hope this short guide helped you discover how to set up and decode UTM parameters in Google Analytics 4. As you’ve probably noticed it’s only a matter of putting everything together, knowing where the data is, and then slicing and dicing so you can get the insights that your business needs.
UTM tracking and the use of UTM parameters in Google Analytics 4 are essential tools for marketers seeking to gain valuable insights into their campaigns’ performance so they are able to make data-driven decisions, optimise their strategies, and drive better results. By properly implementing UTM-tagged URLs, we digital marketers can accurately attribute website traffic and conversions to specific marketing channels, campaigns, and assets.
Hi Omi,
My agency told me that I should be using ‘utm_id’. What is it, and is it supported in Google Analytics 4?
Thanks.
Hi Peter,
Yes, utm_id is supported in GA4.
The utm_id represents the unique identifier for a particular marketing campaign or advert. You can use it to differentiate between multiple instances of the same campaign, which will allow you to track and analyse the performance of individual adverts or links within that campaign.
To give you an example, imagine you are running a marketing campaign on multiple platforms such as Google Ads, Facebook, and Twitter. You can assign a unique utm_id to each advert or link within those platforms. This will enable you to identify the specific source of traffic and measure the success of each individual marketing effort separately.
Hi
I am struggling to understand how to have a detailed report on a specific UTM in my GA4. I know that to check where users are from i need to go here Reports -> Acquisition -> User acquisition -> change to First user source / medium
But I have created a UTM for a campaign and would like to paste it in GA to see how many people came from that UTM, how long they spent on the webpage, etc – is it possible? Or is your Exploration report the closest i can have to see data from 1 UTM?
I would appreciate your help 🙂
Thanks
Yes, you can definitely track detailed data for a specific UTM in Google Analytics 4 (GA4). The path you mentioned is correct for general user acquisition information, but we’ll need to go a bit deeper to isolate data for a specific UTM.
Steps to Track a Specific UTM:
Navigate to “Acquisition” Reports:
Choose “Traffic Acquisition”:
Adjust the Dimension:
Filter by UTM:
– On the right side of the report, you’ll see a section for “Filters.”
– Click the “+” button to add a new filter.
– Set the following:
Apply the Filter:
Additional Insights:
By following these steps, you should be able to effectively track and analyse data for your specific UTM in GA4.
This was great, thank you so much. I miss the days of just being able to drill down into a source and get details. Now we have to create our own reports to find out information that used to be readily available.
The crazy thing is there’s a limited date range in the Explore tab of GA4. Oh well.
Thanks for putting this together.